Content was last updated in 06.23.07-00
Opportunity refers to a futuristic business proposition either received from or requested by a company. An Opportunity may or may not materialize and translate into a project/event/rental/sale. The same is captured while creating an opportunity record.
Add Opportunity: To create new opportunities.
Opportunity records: Displays the opportunity list that had been created so far.
Search grid: To search the opportunity through the search grids which are available in each column headers of the table view. Know more about search grids.
Click the ![]() icon
in the navigation bar.
icon
in the navigation bar.
In 'Opportunity search' window, click the Add Opportunity button.

|
Your window may not show any records on first usage. |
The 'New Opportunity' form displays.
New opportunity form has two tabs as mentioned below.
General Information:Contains opportunity's basic information like opportunity name, company name, etc.,
Activity: Displays various activities associated with the opportunity. This includes a timeline view showing call logs, e-mail conversation associate with the opportunity.
To view the opportunity search in the left-side view port, click the re-sizer icon.

In the General Information tab, you will see the following two sections that required to fill.
In this section, fill the basic details of the opportunity like opportunity name, and contact etc., as shown below.

Opportunity Name: Provide the unique opportunity name in the textbox.
Description: Key in the short description in the textbox.
Company: Select the company name from the dropdown for which the opportunity is being created.
Contact: After selecting the company, by default, system auto-populates the primary contact of the company. However, you can also select any other contact which is being added against the selected company.
Type: Select the type of business from the dropdown.
Existing Business: When the customer is a already doing business with you.
New Business: When the customer is a new one for you.
Close Date: Input the due date of the opportunity.
Stage: Select the phase of the opportunity from dropdown.
Qualification: When both the parties involved are assessing if they should go ahead with the deal or not.
Demo: When a demo is conducted against the opportunity.
Negotiation: When the terms and conditions related to the opportunity are being negotiated.
Won: When the opportunity is won.
Lost: When the opportunity is lost.
Value: Provide the monetary value of the opportunity. If you change the currency to any other currency, the value will be converted to the respective currency.
Margin: Provide the margin that you gain out of this opportunity.
Probability: It refers to the chances of getting the opportunity. Select the appropriate value from dropdown.
Lead Source: This field is to capture from where the customer found your organization to do business. Select the appropriate value from dropdown.
Active: Turn 'On' the toggle button if the opportunity is active. Other wise, turn it 'Off'.
Here, you can capture the additional details of the opportunity.
Select the owner of the Opportunity and the sales persons from the dropdown.

After filling the information, click the Save button.
A confirmation message displays stating that the opportunity is created successfully.
Editing refers to altering or modifying an existing record/information of the opportunity. All the fields are available for editing.
Search for an opportunity.
Click the Edit icon.

The edit window displays.
All the fields are editable apart from the 'Company' field.
Once you make any change, the tab displayed in the top appears with an asterisk indicating that a change has been made but not yet saved.

Modify the required fields and click Save button.
A confirmation message displays once the changes have been saved and the asterisk from the tab now disappears indicating the changes have been saved.
The Activity tab in the opportunity window is a vital element for the CRM tracking process. This tab displays a timeline view of the activities of the opportunity.
Following are the 4 types of activities that are tracked on this timeline.
Notes: To capture/ view the notes related to opportunity.
Call log: To capture/ view the call log details of the opportunity.
Tasks: To create task against the opportunity.
E-mail: To send the e-mails to respective stakeholders and also to view the e-mail conversation.

Click on any month and the expanded view of timeline displays as shown below.
All the activities (Notes, calls, and tasks) created in that month displays.

|
Only one month can be expanded at a time. Opening a different month will close the previously opened month. |
Capturing the notes of the opportunity
You can capture the notes related to the opportunity. Follow the below steps to do the same.
Click Notes button.
Enter the notes related to the opportunity in the textbox. This is a mandatory field to fill.

Click the Create button. The created note displays in the timeline view.

To see the details who captured the notes, you can either click the note icon/message line itself. The window expands to show the details.

Capturing the call log details
You can maintain all the call log details against the opportunity here. Here are the steps to do the same.
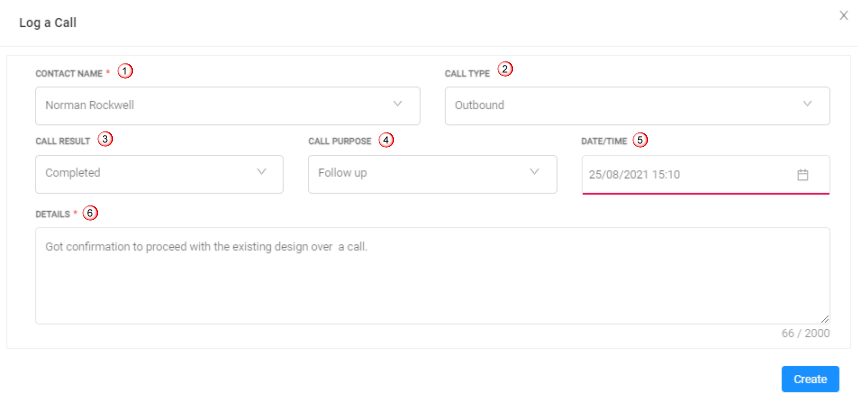
Click Call button.
'Log a Call' window displays as shown below.
Input the required details.
Click here to know more about field details.

After providing the details, click Create button. The created note displays in the timeline view.

Click the Call icon to see who captured the notes.

Creating a Task against the opportunity
You can create task against the opportunity from here as well. This is same as you create a task from activity manager window.
The 'Task' field is mandatory to create a task. Click here to know more about 'Task Create/Edit window'.
The 'Company', 'Opportunity' fields are auto-populated and you cannot modify these fields as you are creating a task against the same opportunity and for the same company.

After adding the details, click Save button.
The created task displays in the timeline view.

Click the task icon to see who created the task.

Running a business smoothly is all about ensuring clear communication between all parties involved. Interacting with team members, clients, and other business stake-owners through E-mail, is one such key form of communication.
R2CRM allows to Send/ Receive E-mails from within the application itself. The E-mail button supports the following features.
Sending and retrieving of e-mails is supported in the application.
Sending e-mails form one participant to the other is available.
Receiving e-mails from the participants is available.
You can view the e-mails in CRM only when you are one of the participant or part of the To/CC address in the e-mails.
Reply / Reply All/ Forward option is available.
The Interface lists all the E-mail that have been sent by you, replied to you, or replied by any of the other people tagged in the Opportunity.
Also, it allows you to respond to any E-mail, by clicking on it. This will open the E-mail Drafting dialog.
Though, by default, the e-mail feature is disabled, you can always enable the button by simply logging into Office 365 using an outlook account or Gmail account from CRM to access the e-mails.
 |
The interface allows to Send/ Receive E-mails ONLY To/From to people tagged to the Opportunity. The system has been designed so as to automatically pull only specific E-mails from your synced Gmail/ Outlook account and make them accessible from within R2CRM. Any E-mails sent to from the external environment of Gmail/ Outlook will not appear inside R2CRM. Also, unless manually added, an E-mail cannot be sent to any party outside of the tagged user list. |
However, before do this, you need to ensure the following:
You have synced your Gmail or Outlook account to their R2CRM login.
|
You can either use ONLY one of the account (Gmail or Outlook) at a time. |
The Gmail or Outlook account used above must is tagged to your R2 Employee Profile. (Go to R2 > Maintenance > Employee > Employee Edit > E-mail).

Sending/ Receiving E-mails through CRM
The integration works based on the participants involved in an e-mail conversation.
E-mails sent/received between these FIVE participants can be accessed in the application.
E-Mail Recipient's Profile |
Description |
Where is the detail entered |
Opportunity Owner |
This is the person who has created the Opportunity In R2CRM |
This is the name from whose' login the Opportunity was Created. |
Opportunity Contact |
This is the contact person for the Company for which the Opportunity was created. |
This is picked-up from the Company details, when it is tagged to the oppotunity. |
Salesperson 1 |
This is one of the three Sales Persons, involved in Pursuing, Following-up, and tracking the Opportunity along with the Owner. |
This name is entered in R2CRM, when an Opportunity i being Created. |
Salesperson 2 |
This is one of the three Sales Persons, involved in Pursuing, Following-up, and tracking the Opportunity along with the Owner. |
This name is entered in R2CRM, when an Opportunity i being Created. |
Salesperson 3 |
This is one of the three Sales Persons, involved in Pursuing, Following-up, and tracking the Opportunity along with the Owner. |
This name is entered in R2CRM, when an Opportunity i being Created. |
To explain the involvement of the above 5 participants we have created a sample workflow.
Click E-mail button, the Send E-mail' window displays.
Draft an E-mail, provide the required fields such as — Recipient address (To, CC, and BCC), Subject of E-mail, and E-mail content.
Click Send button to send the e-mail..
The E-mail sent successful message displays in the window.
The e-mail which is sent displays in the timeline view.

Click e-mail icon to view the conversation.
You can reply/reply to/forward the e-mail as well.

Similarly, you can also view the received e-mail as shown below.

Click e-mail icon to view the conversation.