Content was last updated in 06.01.15-00
Activity Manager is a dashboard for To-do items. This helps you to track all the information related to your tasks. For example: Notes, Follow up notes, presentation notes, any comments related to the tasks etc.,
Along with this, you can create the tasks for follow ups, demo calls etc., either for yourself or to assign to any of your team members.
You have an option to edit the task at any point of time until the task is marked as completed.
If the activity is a recurring, you can mark it as complete and create a new one at one-click.
By default, the activity manager lists all items which are expiring today. However, you can also view the over-dues, completed, and/or yet to start tasks also.
Due Today: This is the default view of activity manager window, and it lists the tasks that are due today.
Overdue: Lists the tasks that are overdue (where the due date is earlier than today).
Upcoming: Displays the tasks that are due for future dates (due date is beyond today).
Completed: Displays the tasks that are completed (regardless of the due date).
All: Displays all the tasks irrespective of their status or due date.
Manage task: To create/edit/delete/complete the task.
Activity list: Displays the activities list based on which tab you are currently in. For example: If you are in 'Completed' tab, then you can only view the data of a task which is overdue.
Search grid: To search the task through the search grids which are available in each column headers of the table view. Know more about search grids.
Now ,lets move to create task..
In the navigation
bar, click the Activity Manager ![]() icon.
icon.
In the 'Activity Manager' window, click the Create button.

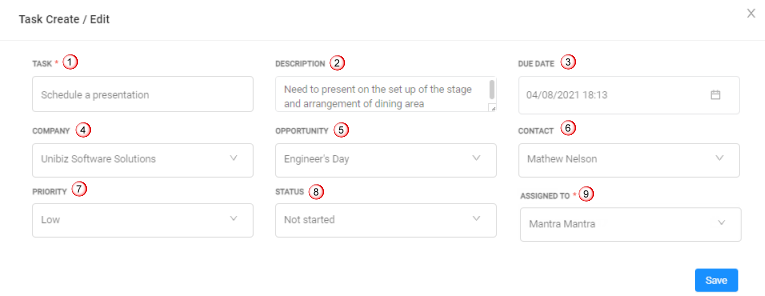
The 'Task Create / Edit' dialog box displays.
Fill the values for the fields. Click here to know more about the fields.
After filling the details, click the Save button.

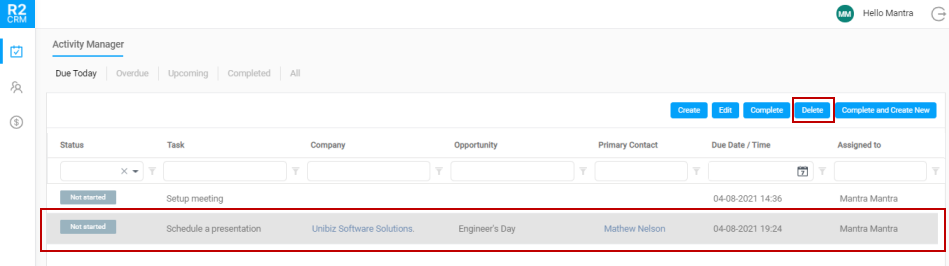
The created task displays in the search window as shown below.

Yeah..you successfully created a task!!
Select the task, and click Edit button.

'Task Create /Edit' form displays.
All the fields are available for editing.
Modify the required fields and click Ok.
All the latest changes will be saved and ready for your view.
|
You cannot edit the task which is already marked as 'Completed'. |
Select the task which needs to be marked as complete.
Click the Complete button a shown below.

Select the task which needs to be deleted.
Click the Delete button and respective tasks will be deleted from the list.
 |
You cannot delete the task which is already marked as 'Completed'. |
Lets assume, you have an existing task which you want to mark as 'complete', however you want to create another task with the same data of your existing task. Obviously, you would not want to enter the details all over again. This problem is resolved by the 'Complete and Create New' button (as highlighted in Figure 6.0).
This way, when you select and open a task and click the 'Complete and Create New' button, it marks the existing task as complete and copies the task information to a new task.
Select a task which needs to be competed.
Click Complete and Create New button.

The task is marked as completed and new form displays with the details of completed task.
All the fields are editable.
Modify the necessary data and click Save button.

After saving the data, a new task is created and displayed in the search window.