Content was last updated in 06.22.10-00
Prep is nothing but prep and fill item in warehouse app. This function allows you to load the items, kits,and assets to the truck/ container/ box so that it can arrive to the destination on time.
Order details: Displays the order header detail like Order no., description, Payment terms, Start and end date etc.,
Enter product ID/ Asset ID: Enter the product id/ asset id to fill the item.
Scan the product/asset: Scan the product/asset to fill the item.
Enter Container ID: Enter the container ID so that the item can be filled.
Scan container: Scan the product/asset to fill the item.
Item list: Displays the item list which need to be filled.
Fill all: To fill all the items listed on the order.
Report: To retrieve the pick list report.
All:
Departments: Displays the department list.
Expand all: Expands the kits, packages.
Collapse all: Collapses the kit children, packages etc.,
The following screen appears as shown in Figure 2.0.
The window shows all Orders which are waiting for Prep operation. .
The list of Orders can be sorted on basis of either of the 3 parameters — Order Date, Order# and Customer Name.
Double tap to select the Order, for which you want to perform the Fill operation.
The possible manner in which workflow may proceed would differ for serial and non-serial assets.

From the above screen, tap the link below to know about two kinds of Orders.
 ORD-1341
filled with Only Serial and Non-serial items.
ORD-1341
filled with Only Serial and Non-serial items.
 ORD-1369
filled with both Items and Kits items.
ORD-1369
filled with both Items and Kits items.
The header portion of the Order Prep window, can be collapsed, to hide Order Information section.
To hide it, tap the – button on the top-right corner of the screen.
However, when the part it hidden the button changes to +.
A quick animation of the Collapse/Expand sequence is given below.

After
opening an Order, to view the Pickup List, tap the  icon.
icon.
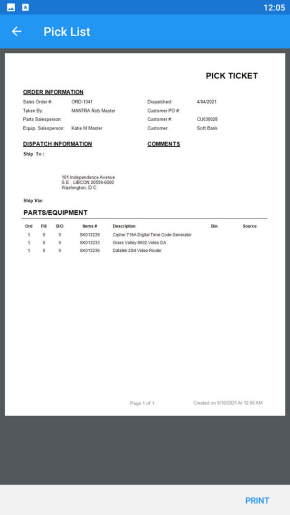
The pickup list acts as a ready reckoner for the delivery/dispatch team.
A pickup list has 4 sections (3 in header and 1 in body).
Order Information: Basic information about the Order, which is required to understand process it.
This section has total 8 fields. Details are given in the table below.
Column name |
Description |
Sales Order # |
Possibly an alphanumeric string, which is the Order's serial number. |
Taken By |
Name of person who processed the Order. |
Parts Salesperson |
Name of person who coordinated the sale/renting of parts. |
Equip. Salesperson |
Name of person who coordinated the sale/renting of equipment. |
Dispatched |
Date on which the part was sent. |
Customer PO# |
Purchase Order number raised to the Customer on the current Order. |
Customer# |
Customer's registration number in the system. |
Customer |
Customer's name as per record in the system. |
Dispatch Information: Location information address to which the order is supposed to be dispatched.
Comments: Any additional instructions or note given about the order, which needs to be followed during Fill, Ship, or dispatch.
Parts/Equipment: Detailed information about the parts or equipment which are included in the Order.
This section has total 7 fields. Details are given in the table below.
Column name |
Description |
Ord |
Qty or Number of items requested on the Order. |
Fill |
Qty or Number of items actually filled on the Order. |
B/0 |
|
Item# |
SKU or Serial number of the Item. |
Description |
Detailed/Short text description of the item. |
Bin |
Bin number of the item where it was kept/stored. |
Source |
A sample output of Pickup List is given below.
To
print the pickup list, tap the  button at the bottom
of the screen.
button at the bottom
of the screen.
Depending on the existing configuration on your mobile device, it prompts you to either select a physical printer or save the file as PDF.
Once your order is Prepped with all the items and Kits listed in an Order, it is time for you to fill it and keep it ready for dispatch.
To fill a line item you should tap on it. If the item is a part of a Kit or a Serial Item, the system prompts the following screen.
Here you must select any serial number for the Serial Item or Child-kit item. Then tap the Fill button.

This option is available only when the status of the line item is Filled or Out.
To view the item's image, tap on the item line, and the following window appears.
Tap 'View Image' to see the image. Tap of 'Cancel' to quit the window.